|
Search Bev's Country Cottage Afghans / Armed forces / Babies / Preemies / ♥ Bev's Dreamin' Shop ♥ / Doll clothes / Children / Christmas / Cross Stitch/ Hospital / Household / Humanitarian Aid / Loom knitting / Recipes / Seniors / Size Charts / Winter / Come
join our Humanitarian Crafting Neighborhood on Facebook How
to LOOM knit @>->~~ ~~<-<@ YOU can make these adorable dolls! Click on the picture for free pattern!
Creating a Flat Panel - at youtube @>->~~ ~~<-<@
Bev's Basic
Information
on loom sizes, number of pegs etc.
Newborn Loom - Blue 24 pegs 4 3/4" diam. - is for large preemies and small newborns Brim: 12 rows Finished brim: 6 rows Finished hat with brim: 15 rows tall Baby Loom - Red 31 pegs - fits children 1 - 4 Brim: make 3" then fold up Finished brim: 1.5" Finished hat with brim: 6.5" to 7" tall Child Loom - Green 36 pegs - fits kids 5+, teens, small adults Brim: make 4" then fold up Finished brim: 2" Finished hat with brim: 7" to 8" tall Adult Loom - Yellow 41 pegs - really large heads or use to make blankets by going back and forth instead of around loom Brim make 5" then fold up Finished brim: 2.5" Finished hat with brim: 8" to 9" tall @>->~~ ~~<-<@ REMOVING hats from looms BASIC E-WRAP for round loom 1) One of the keys is to anchor the yarn in the little thumb tac at the beginning of your round - I leave a 3" tail of yarn.
2) WRAPPING
THE PEGS: 3)
Wrap LOOSELY (I
place my left thumb near where I am
about to wrap each stitch - see photo#1 below. I loosely wrap
the peg, and gently push the yarn/wrap down, holding the
loosely
wraped yarn down until the next peg is wrapped and then I do the same
with that one.) Go CLOCKWISE around the loom to wrap. The actual peg is actually wrapped in a counterclockwise direction- under and over and around - to form a letter 'e'. It should form a cursive letter 'e' as you wrap each one. 4)
Go all around the loom, wrapping each peg ONE time, with 2 (or 3)
strands of
yarn. Now you are
back
at the thumb tac or beginning. (Photo 1 below)
5)
Start wrapping around each peg one
more
time for single stitch
-
go all around. ***
For a tighter weave,
you can use ONE strand and
wrap the pegs 3
times instead of just twice
- (simply lift your first 'wrap' over the other 2 wraps) this
gives a tighter
'knit' to the fabric and it's called DOUBLE STITCH-- (" * Double Stitch
Wrap each peg 3 times. Now lift one st over 2 each time. This makes a tighter stitch than a plain Single stitch." prefered for
warmer hats. When you are done wrapping twice around, anchor the yarn to the tac by wrapping it around the tac again so it doesn't all unravel. You are ready to knit.KNITTING:
  7) Repeat knitting around the ring. You
have completed one row of knitting! Now wrap each peg again
once
around loom.
Anchor the yarn on tac and knit another row. You are now loom
knitting! Keep wrapping and knitting off.
MAKING A BRIM REMOVING
ITEM FROM LOOM- Bev's Method 1 Makes a 'gathered top'
2) Cut a yarn tail about 15" long. 3) Thread a yarn needle with yarn tail. 4) Insert needle into the 2 strand stitch left on each peg. (figure 1) 5) Pull needle and yarn all the way through the stitch on peg. 6) Lift stitch off peg. 7) Keep removing each stitch on pegs around loom in same manner. (Figure 2) Gather the top and tie a little knot at end of yarn. (Figure 3) 8) Using a crochet hook, pull the tail through to the inside of the hat, and weave it through several stitches to secure it. Cut yarn leaving 1/2" showing inside. DS = double stitch CBS = chunky braid stitch PCS = popcorn stitch FS = Flat Stitch Single
Stitch *
Double Stitch Chunky
Braid Stitch Flat
Stitch Where
to buy Looms Round knitting looms on Amazon CinDWoods Craft Looms-- Love the wood used on these looms and the 1/2" gauge on some of them. Their 12 peg bootie loom is fantastic! KISS looms - I have not purchased their looms, but found them on a loom search. Knittingboard.com I have not purchased their looms, but found them on a loom search.
Loom
Links
All Bev's Country Cottage pages Copyright Beverly A. Qualheim - All Rights Reserved.
|


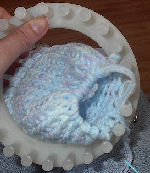
 (2) Underneath
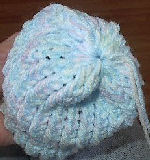