


Cast on 66 stitches with light color. (This will be the heel area)
 Row A- outside) Knit 6 sts
with color #1, then add in color #2 and knit 6 sts. Alternate
the colors every 6th stitch across the row, pulling the 2nd color in
the back of the 1st. It needs to be pulled a little on the backside to
make the puffy
rows. (The 'pulled-to tighten' strand needs to be about 3/4" - 7/8"
across
back of each set of 6 sts.)
Row A- outside) Knit 6 sts
with color #1, then add in color #2 and knit 6 sts. Alternate
the colors every 6th stitch across the row, pulling the 2nd color in
the back of the 1st. It needs to be pulled a little on the backside to
make the puffy
rows. (The 'pulled-to tighten' strand needs to be about 3/4" - 7/8"
across
back of each set of 6 sts.)
Row B - inside) Knit the same as row A. Change the colors every 6th stitch across the row, pulling the 2nd color slightly (pulled strand in on the side facing you on this row) to match 3/4" - 7/8". (See below ***)
Repeat
Rows A and B for the length you desire.
Knit
until desired length is reached or approximately:
20 ridges for ages
3-6 (40 rows)
24 ridges for ages 7-11 (48
rows)
30 ridges for ages 12+
(ladies) (60 rows) with size 8 needles this makes
an 8 1/2" slipper
34 ridges for mens med/large (68
rows)
4
rows of DECREASE:
1) *Knit 2 together,
repeat from *across
all
the stitches. (33 sts)
2) Knit across the inside of
the slipper (backside)
3) Cast off down to 22 sts by
*knitting 1 st, then k2 together; repeat from * across row.
4) Knit across the inside of
the slipper (backside)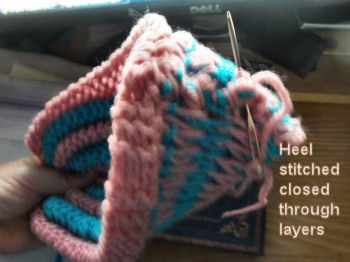
 Cut color #2 (turqua) leaving a 4" tail to weave inside
slipper to secure. Cut color #1 (pink) leaving an 18" tail of
yarn for stitching down side. 1st GATHER toe sts tightly and
secure.
Cut color #2 (turqua) leaving a 4" tail to weave inside
slipper to secure. Cut color #1 (pink) leaving an 18" tail of
yarn for stitching down side. 1st GATHER toe sts tightly and
secure.
♥ Now, fold over the long edge 6 sts, which are 'flat ' right
now, and stitch down slipper long side to form another ridge, end off
by securing yarn, cut yarn. (See photo on left). Fold over 2nd
side and repeat sewing.
♥ Flip slipper inside out and sew heel shut. (Photo on right)
♥ Flip back to the right side and sew
across top of slipper to close, leaving enough room to insert foot.
♥ Make a pompom for the top and sew to top of slipper.
HELPFUL HINTS AND PHOTOS


*** As you
knit across Row B, make sure the color you are using (we'll call
it color #1) is taken to the 'outside/front' of the slipper to knit
those 6 sts. Then bring
color #1 back to the 'inside' of the slipper, and move color #2 to the
front (as in
photo to left) Don't forget
to do this with each color change...
Your working color will be on the outside/right side of the slipper and your non-working yarn will be facing you, on the inside of the slipper. (See photo on right)

I found that I needed to 'twist' some of the
stitches as I changed colors, (See photo below) especially with the
first color change of each row, to avoid a small hole. (By the
way, the first 6 sts and last 6 sts of each row remain 'flat' but we
will fix that at the end.)