Afghans
/ Armed forces / Babies
/ Preemies /
Amazon Bookstore
/ ♥ Bev's ETSY shop ♥ /
Doll
clothes / Children
/ Christmas
/ Cross
Stitch/ Hospital
/ Household / Humanitarian
Aid / sent by reader: LORI80JIM@aol.com (email no longer works) But see detailed notes below! Thanks GuppyGirl for the photos too!! You did an amazing job!  
Crochet
Hook size H
Chain
127
Row 4-* sc in first 2 st- 2dc in pocket. Repeat from * across, ch 2 turn .
Row 5- Sc across. Repeat rows 4 & 5 until desired length. Finish
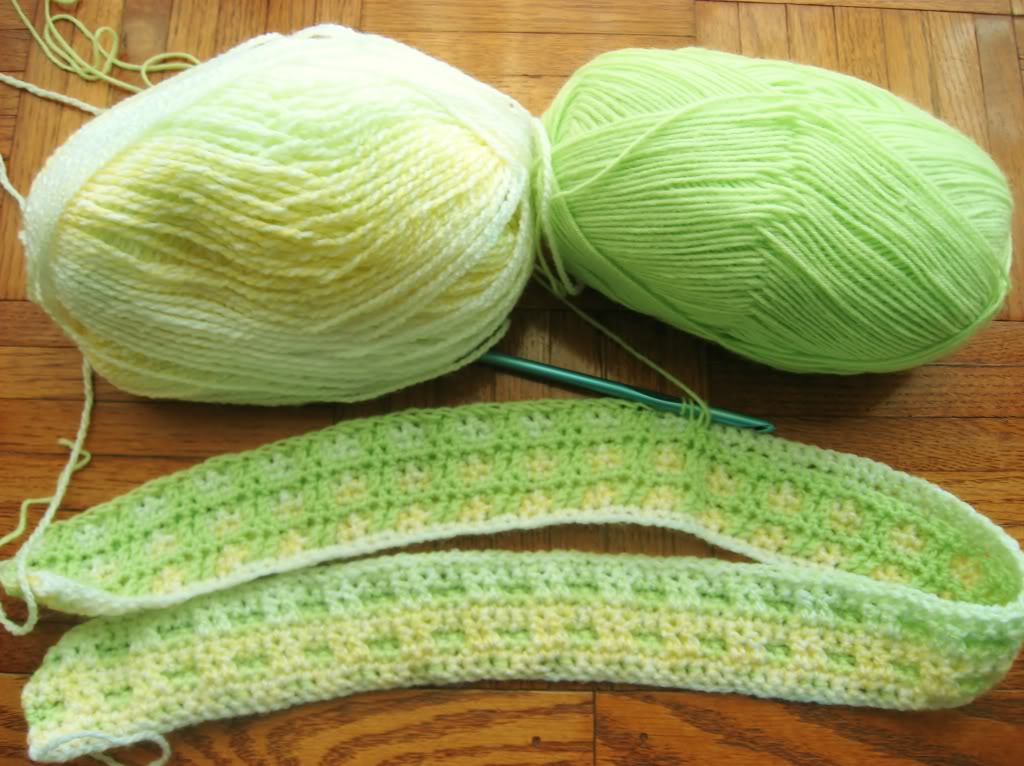
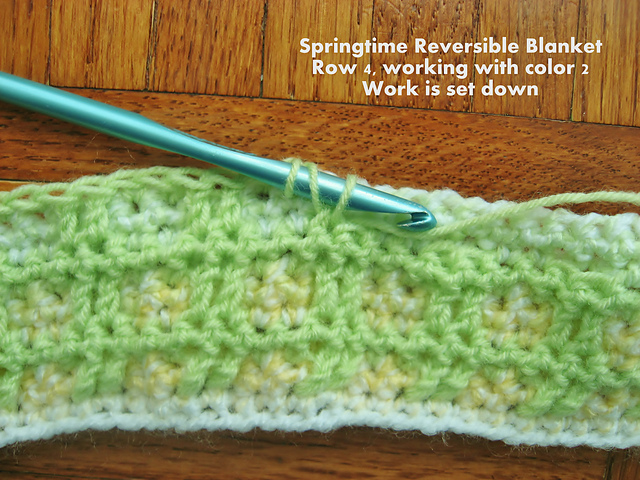
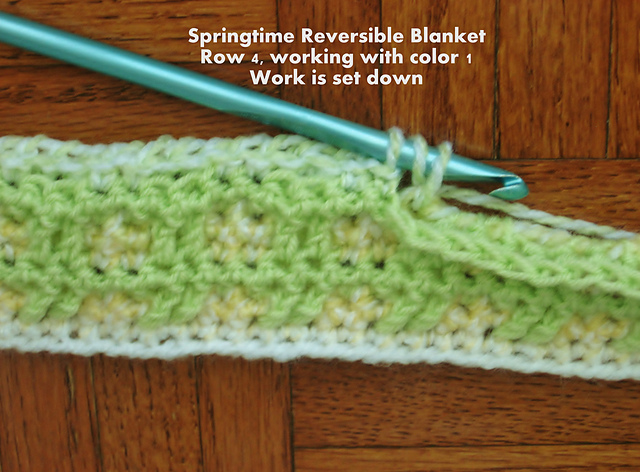
with scalloped edge-- crochet 4 rows.  NOTES by 'GuppyGirl' on Ravelry. "I started this blanket in response to this post. I happened to have yarn that I thought would work well with the pattern and we have a few relatives that will be having a baby soon, so I thought it would be handy to have a blanket in progress anyway. The pattern needing pics is a little vague in spots so I am making some detailed notes for this project. A little disclaimer right off the bat: The pattern calls for a size H crochet hook. I am using a J because I crochet pretty tightly. Also, I am left handed, so the pics I’m including here will reflect that. Alright, down to the details ;) This is an interesting blanket with a bit of texture to it. It’s ‘reversible’ because one side winds up looking different than the other. Texture for both sides is the same, but the color is different on each side. One side will show more of the first color you are using with the second color peeking through. The other side will be the reverse - more of the second color showing and the first color peeking through. The first pic I’ve included here shows the yarn I am using and a bit of the blanket in progress. I’ve folded it over so both sides can be seen. The pattern can be found at Bev’s Country Cottage and is attributed to a reader named Lori, but her contact info is no longer valid. Hopefully my notes will help anyone who wants to attempt to make this blanket. The blanket begins with a chain st foundation. The first 3 rows in the pattern are set up rows and then the 4th and 5th rows are repeated until the length you want is reached. Stitches you need to know are just sc and dc. The blanket is fairly straightforward, with just a slight challenge in rows 2 and 4 because the dc stitches are dropped down two rows below the one being worked. I’m including pics (left handed) of these stitches being worked in the rows below on this project page. I hope they will help with finding where to place the stitches that are dropped down. Also, the blanket is worked in 2 colors. The yarn is not cut when changing colors, but carried up one side of the blanket. You will drop one color and pick up the second. Color changes are made before beginning row 2 and before beginning row 4. Rows 1 and 3 are just straight single crochet all the way across. Rows 2 and 4 begin and end with 2 sc. The stitch repeat on these 2 rows is actually sc, sc, dc 2 rows below, dc 2 rows below, sc, sc, etc. The dropped dc stitches are worked differently in each color. One modification that I made on this blanket was to repeat row 1, once. This blanket begins with a row of sc and is ended with a row of sc. I feel the extra row 1 gives the beginning and finishing end of the blanket a more uniform look. Also, it is easier to work around the sc posts than into the foundation chain when dropping the dc stitches down in row 2. In row 4, the pattern refers to a pocket. This can be a bit confusing. It really is just referring to a fabric characteristic that is created when you drop the dc stitches. When you drop the dc stitches down to the rows below, two of the stitches on the row being worked will remain open/un-worked and this creates a bit of a pucker or texture on the surface of the crocheted fabric. The author of the pattern calls these two skipped/open stitches a pocket. You will just be dropping down and working into those 2 stitches when you are working a row 4. One other thing to be aware of is that row 4 will be worked differently with color 1, than it is worked with color 2. This is because those 2 open stitches (the pocket) will be on different sides of the work for each color. I consider color 1 to be the color I worked my foundation chain, row 1, and the extra row 1 in. Before beginning row 2, the pattern instructs you to pick up a new color. In this blanket, that is the solid spring green color. I am considering that to be color 2. I am including pics (with captions) of row 4 being worked with both color 1 and color 2. The pattern indicates that you will switch colors at the end of Row 1 and at the end of Row 3. There is a slight problem with listing it this way, because rows 1 and 3 are only worked once, so you need to realize that you need to be switching colors the one time you begin a row 2 and each time you work a row 4. I obviously haven’t reached the scalloped edging yet, but it looks to be pretty straightforward. If I need to add any notes on it, I will come back and do that when I get that far. One thing that I think will be good to watch out for when edging the blanket: When working the border on the side that has the color switches carried up it, be sure to crochet into the actual stitches at the side of the blanket, rather than into the yarn strands carried up the side. There will be more slack in the carried yarn and your edging may not look as nice if you work into the carried strands. Alright, back to work ;) PS - currently, my work measures 33” across. The scalloped border will add maybe an inch overall in the width and length. If you wanted to make a bigger blanket, you could increase your beginning chain. I think you need multiples of 4, plus 3. This would give you the sc, sc, dc, dc, (equals a multiple of 4) and the two sc at the end, plus the one chain you need to bring your work up to the correct height for the first row of sc (the reason for the plus 3). 8/11/11 - I’m very nearly out of color 1 (the color I started the blanket in) so I’m getting ready to start the scalloped edging. Before I do that, I want to talk about closing up the last ‘pockets’ (skipped/open stitches). The pattern doesn’t really address this, but there are no other places in the blanket where the ‘pockets’ remain open, so I am closing them up on both sides with my last row 4. I thought I’d detail how I did that here in case anyone else wants to close up the last open stitches before finishing their blanket: Closing the last pockets/open stitches - This might sound complicated, but it is really pretty simple. This is done when the blanket is nearly the desired length and row 4 is being worked for the very last time. Work the sc stitches as usual. The dropped dc stitches are worked almost the same as previously, with one little change. So, work the first 2 sc stitches, then do the following for the next dc stitch:
Continue working in this manner for the final row 4 and there will not be any open/skipped stitches when you are ready to edge your blanket. I am working on the edging now. I almost missed that the pattern instructs that the border should be 4 rounds total. I was going to go around the blanket at least 3 times anyway because I had quite a bit of the solid green yarn left. The border instructions would make more sense if they read: 1 sl st * sk 2 sts, 5 dc in next st, sk 2 sts, 1 sl st in next st. Repeat from * around. (Note: I am subbing sc stitches for the slip stitches just because I want to ;D) 8/16/11 All done. I decided to work the
edging around the blanket 6 times, rather than just
4. This turned out really pretty and was fun to work on.
*
©
COPYRIGHT:
All
content is
copyrighted to original creators. You may direct
LINK to pages,
but you may not post patterns anywhere in any media form. Any
items made from
patterns © to Beverly Qualheim may be sold, but please make
one for charity too.
|

