 Check
out Bev's
BLOG ~
Bev's Journeyings
for knitting, crochet, recipes, and news!
Check
out Bev's
BLOG ~
Bev's Journeyings
for knitting, crochet, recipes, and news!![]() Do you like this website page? Click here to
refer it to a friend!
Do you like this website page? Click here to
refer it to a friend!
Copyright 2001, 2008 Beverly A. Qualheim All Rights Reserved.
Please do NOT sell booties made from this pattern. They are for
charity or personal use only!
1000's of these booties have been made for babies worldwide. They
are often the first pattern readers try when they are learning to
crochet. ENJOY! There have been a couple of pattern adaptations
since I created these in 2001.
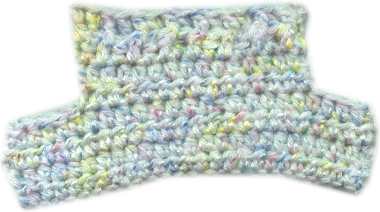
 I
made up this pattern while I was recovering from surgery. It is
quick and easy and good for beginners! You could make several pairs in
one evening.
Booties are made in one piece and folded in half. You can make them all
different sizes by varying hook size or number of stitches and rows.
I
made up this pattern while I was recovering from surgery. It is
quick and easy and good for beginners! You could make several pairs in
one evening.
Booties are made in one piece and folded in half. You can make them all
different sizes by varying hook size or number of stitches and rows.
Size G
hook
(H hook if you crochet tightly)
About 1 oz of soft 4 ply worsted weight yarn (Simply Soft works
great!)
Foot Length = 3 1/2 - 3 3/4"
Height from sole to top of
bootie is
about 4 - 4 1/2"
Instep (from sole to ankle
bone) = 1.75"
- 2.25"
ABREVIATIONS:
sts = stitches; ch = chain; dc = double crochet; sc = single crochet;
sl st = slip stitch, FP and BP = front post and back post;
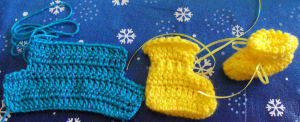
WHIP STITCH
DIRECTIONS to stitch booties shut
Bottom of bootie foot
Ch
25 (Ch 27 if you use Simply Soft yarn)
ROW
1: Dc in
2nd ch
from hook and in each ch across. (24 dc
or 26 dc for SS yarn) Ch 2
(counts as a DC on next row),
turn
ROW
2: Dc in
each
dc across row (24 dc, 26 dc for SS
yarn). ch 2, turn.
ROW
3 :repeat
row
2.
ROW 4: repeat row
2, but do not chain 3 at the end, just turn
ROW
5 (This
next part forms the top of bootie): sl st in the
first
5 sts, ch 2 -in
that 5th st- (counts as
one
dc) dc in the same st and then in the sts across leaving 4 unworked at
the end.. (14
dcs)
Chain 2, turn
ROWS
6 and 7 :
Dc in
each dc across the 14 sts , ch 2 and turn (14 dcs)
ROW
8: Girls
top: Sc into
1st
st near hook, ch 3, sc in next st, repeat across to make a ruffle on
the
top.
ROW 8 alternative .: Boys top:
Alternate making a *FPDC and *BPDC across row, working the stiches in
the
front or back of the sts in the row below.
Finish
off.
~Fold piece in half
and whip-stitch
up using yarn and big eyed needle - this
is the wrong side of the
bootie. Flip booties right side
out and shape them with your hands to make them more puffy and rounded.
FOLD TOP DOWN.
~ * ~ IMPORTANT:
Weave a length
of ribbon in and out of the row above the heel to tie booties. Or
crochet a contrasting colored chain of about 50 chains. ~ * ~

 Little
Clara
-(approx.
2 lbs) is sporting the latest in High-Top Fashion for preemies in her
very
own
Little
Clara
-(approx.
2 lbs) is sporting the latest in High-Top Fashion for preemies in her
very
own
'Bev's
VERY Easy Preemie Booties'
(Also made in one
piece and
folded in half.)
Size G hook and a few
yards
of soft 4 ply worsted weight yarn. Use an F hook for smaller booties.
Booties will fit a
4-5 lb
baby - measures approx. 3"
Size F hook and a few yards of baby
yarn for
a 2-3 lb
baby Smaller
booties = approx. 2.5" long
Sole of bootie
Ch 23
ROW 1: sc in
2nd ch
from hook and in each ch across. Ch 1, turn (22 sc)
ROW 2: sc in
each
sc across row (22 sc). ch 1, turn.
ROW 3-5:
repeat row
2, except on row 5, don't ch 1 at the end, just turn.
(This
will make a narrow bootie- as preemie feet are often long and
skinny.
Feel free to add a couple more rows to make them wider though.)
ROW 6 (forms the top of bootie): sl
st in
the first 6 sts, ch 3 (counts
as one
dc), and make 1 dc in the same
st,
dc in the next few sts leaving the last 5 sts unworked. (12 dc)
Ch 2, turn
 ROW
7 : Dc in each dc across. (12 dc)
ROW
7 : Dc in each dc across. (12 dc)
(If you want a taller bootie do
2 dc
at end of row 7, turn and repeat row 7 once)
Finish off.
Fold in half and
whip-stitch
up using yarn and big eyed needle, to form bootie.
 These
turn out a little tighter and warmer.
These
turn out a little tighter and warmer.  Special
update from Bonnieboo. Thanks for your help Bonnie:
She worked the pattern as given until row 4:
Special
update from Bonnieboo. Thanks for your help Bonnie:
She worked the pattern as given until row 4: