♥ Join us on our "Bev's Country Cottage Neighborhood" FACEBOOK group too! ♥

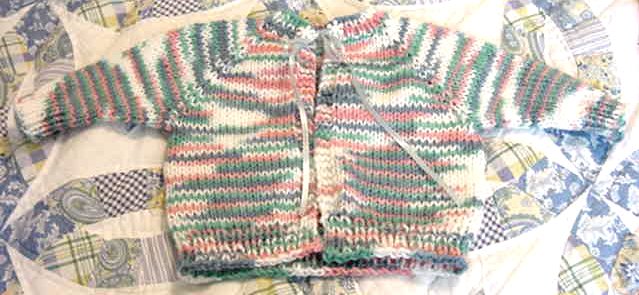
This is a variation of the back zipping baby sweater on
my (archived) site. It has been edited to become a sweater that opens
in the front with no hood. You can still use a zipper for the front or
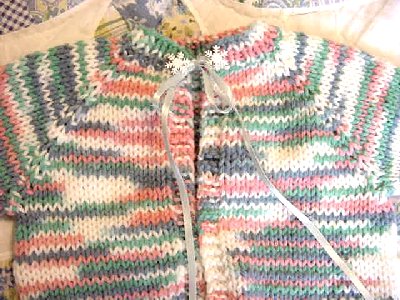
add ties like shown in the picture or instructions are given for
buttonholes.
I usually do the sleeves in a round with double pointed
needles so there are less seams. I really dislike seams and knitting in
more than one piece.
There is a closeup picture at the bottom of the page.
| Sizes | 6 months | 9 months | 12 months |
| App. Weight: | 18 lbs. | 20 lbs. | 22 lbs. |
| Garment Measurements | |||
| Chest | 19 " | 20 " | 21" |
| Length to Underarm | 6 " | 6 " | 7 " |
| Sleeve length | 5 " | 6 " | 6 " |
Size note: Instructions are written in smallest size with changes for larger sizes in parentheses.
Materials: Worsted weight yarn, 6(6 - 8)oz. [approx 170(170 - 227) grams] any color you desire. Straight knitting needles sizes 6 and 8 or size needed for gauge; 2 stitch holders.
Optional: 4 - size 6 and 8 double pointed needles for sleeve.(I like to knit it in a continuous round so there are less seams to finish). Also a 16 - 24" circular needle for the bottom of the sweater. It makes it easier to knit than having all the stitches on one long needle.
Gauge: With larger needles in stockinette stitch, 9 st = 2"; 13 rows =2".
Notes:
Button Hole Rows:(optional) Row
4 should be the first buttonhole row. Decide if you want to have button
holes on the left or right side of the sweater. The first 4 or last 4
sts(Purl sts) of the row will be used for the button hole. They are
made as follows - (p1, yo, p2 tog, p1). Do this evenly spaced down the
front of the sweater. 3 to 5 buttonholes if usually enough. The sweater
in the picture has no buttonholes.
Instructions:
Neck: With smaller size needles cast on 48(50 - 52) sts loosely and work in k 1, p1 ribbing for 7 rows.
Change to larger size needles.
Raglan Shaping: Row 1 (Inc
Row): P4, K4 for right side of back, knit in front and back of next
st(inc made), place marker on needle, inc in next st, K4(5-5) for left
sleeve, inc in next st, place marker on needle, inc in next st, K
16(18-20) for front of sweater, inc in next st, place marker on needle,
inc in next st, K4(5-5) for right sleeve, inc in next st, place marker
on needle, inc in next st, K4, P4 for left side of back: 56(60-62) sts.
Row 2: Purl across, slipping markers.
Row 3: P4,
*Knit to within one st of marker, inc in next st, sl marker, inc in
next st; repeat from * 3 times, knit across to last 4 sts, P4. Rep Rows 2 and 3, 10(11-12) times more. Rep Row 2 once, removing markers. 136(148-158) sts
Dividing Row: P4, K 17(18-19), CO 4 sts (keep on the body needle), place next 28(32-34) sts on holder for sleeve, K 38(40-44), CO 4 sts (keep on the body needle), place next 28(32-34) sts on holder for sleeve, K 17(18-19) P4. Work even in stockinette st except for the P4 at the beginning and end of every K row(knit 1 row, purl 1 row) until piece measures 5 (6-6 )" from CO sts at under arm.
Change to smaller needles and work in K1, P1 ribbing for 1". Bind off all sts loosely in rib.
Sleeve: With
right side facing and lower rib at top, using larger size needles, CO 2
sts, K 28(31-33) sts from holder for sleeve, CO 2 sts, purl 1 row, knit
1 row until sleeve measures 1" from CO sts at arm, ending by working a
purl row.(if using double pointed needles cast on and knit sts from
holder as above but evenly distribute between 3 needles. knit each
round remembering where the first st is. Dec Row: K2
tog (dec made), knit across to last 2 sts, k2 tog. Rep Dec Row every 1"
3(4-4) times more: 20(22-24) STS. Work even in stock st until piece
measures 4 (5-5 )" from CO sts at underarm. Change to smaller size
needles. Rib Row 1: *K1, P1; rep from * across. Rep Rib Row 1, 3 times more. BO all sts loosely in rib. Rep for 2nd sleeve.
Finishing: Sew
sleeve seams. Sew CO sts at underarm tog. With right side facing, using
crochet hook, join yarn with sl st at lower edge of left side of back
opening and work one row sc along left edge of back, around hood, and
back down right side of back opening; finish off. If you have made
button holes you can now sew on your buttons. A size 7/16" or smaller
usually work ok.