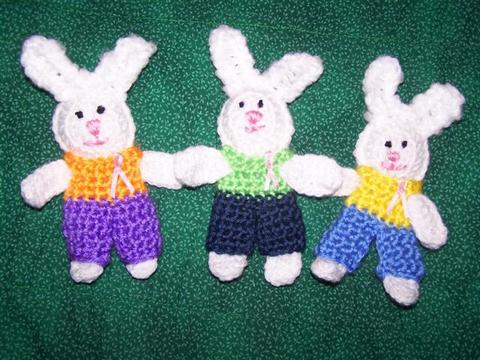
Bev's Country Cottage.com


Search Bev's Country Cottage

Afghans / Armed forces / Babies / Preemies / Amazon Bookstore  / ♥ Bev's ETSY shop ♥ / Doll clothes / Children / Christmas / Cross StitchHospital / Household / Humanitarian Aid / Loom knitting / Pets / Recipes / Seniors / Size Charts / Winter / What's New / Bev's BLOG


Bev's Pink Ribbon Bunny
Copyright 2007, 2019 Beverly A. Qualheim

Based upon (archived copy)  Gail W. Mayes bear pattern
Small amount of white, 4 ply worsted weight yarn, small amount of contrasting yarns for dress colored yarn
Size G crochet hook for bunny body, H hook for bunny dress

Bunny Body
Ch 3 (counts as a dc) and then make 11 more dcs in the first chain (12 dcs)
Rnd 2 - Ch 2, hdc in same st, 2 hdc in ea st around, join to top of ch 2 (24 hdc).  (Head is formed)
First Arm - Ch 10, dc in 4th ch from hook and in each remaining ch, sl st in same st on head (8 dc).
First Leg - Ch 15, dc in 4th ch from hook and in each remaining ch, sl st in next st on head (13 dc).
Repeat for another leg and another arm. .

On first side of the bunny, end off yarn. On second side of bunny, ch 1 but don't end yarn.  

Crocheting Sides Together:
Hold both sides together tucking the yarn ends inside the head, with face facing up, sl st in ea st around matching sts, starting with right arm. Join right leg, left leg, and left arm. Sl st in first 6 sts of head. Ch 8 and dc in 4th ch from hook and back down to head. (bunny ear formed) then skip one st and join with a sl st. Sl st in next 4 sts. Make a 2nd ear by chaining 8, dc in 4th chain from hook and back down to head.   Stuff the head very lightly with fiberfill. Sl st in last 6 sts on the head. Fasten off yarn.  You can stitch the leg tops and ear bases shut if you wish.  

Using craft paints, paint a face on the bunny.

Dress:  Use a Size H hook for Dress
Row 1 - With plain color yarn and leaving 8" tail to start, ch 16, sc in 2nd ch from hook and in ea st across, ch 3, turn (15 sc).
Row  2 - Dc in next 2 st, ch 2, sk next 2 sts, dc in next 5 sts, ch 2, sk next 2 sts, dc in last 3 sts, ch 3, turn 
Row  3 - Dc in ea st and ch across (15 dc).
Cut yarn, place dress on bunny and stitch up back. 
Row  4 (Ruffle)  - 2 dc in each dc across (30 dc)
Fasten off yarn and weave in yarn ends.
Depending on the yarn you used, you may need to make the dress a little larger - just increase the starting chain and sts used on sides and back of round 2.

Pink Ribbon to stitch to front
Size F hook and tiny amount of pink baby yarn
Ch 12
Sc in 2nd chain from hook and in each ch.   End off. Fold into ribbon shape and stitch on to front of vest. Stitch into the folded part of ribbon.

For a BOY BUNNY make this vest:
Vest: Use Size H hook
Rd 1 - With vest color yarn and leaving 8" tail to start, ch 16, sc in 2nd ch from hook and in ea st across, ch 3, turn (15 sc).
Rd 2 - Dc in next st, ch 3, sk next 2 sts, dc in next 5 sts, ch 2, sk next 2 sts, dc in last 3 sts, ch 3, turn.
Rd 3 - Dc in ea st and ch across (13 dc).
Fasten off yarn and weave ending tail inside the vest..
Thread yarn needle with starting 8" tail and stitch the top of the vest on one side with the top of the vest on the other side (Stitch about 4 sts). Weave in all yarn ends.


or from Betty- these wonderful clothes!!

Boy Bunny's Shirt & Pant Outfit
Copyright 2007 Betty Cook - All Rights Reserved

2 different colors of yarn (A & B) for shirt and pant
Size H crochet hook
SHIRT
Row 1 - With color A for shirt, starting at neckline and leaving an 8" tail, chain 19 stitches, sc in 2nd chain from hook and in each stitch across, ch 1, turn (16 stitches)
Row 2 - Sc in first 3 stitches, ch 2, skip next 2 stitches (to form armhole), sc in next 6 stitches, ch 2, skip next 2 stitches (to form other armhole), sc in last 3 stitches, ch 1, turn (16 stitches)
Row 3 - Sc in each stitch across row, ch 1, turn (16 stitches)
Row 4 - Repeat row 3, attach Color B for pants at end of row, ch 1 with color B, turn
PANTS
Row 5 - Sc in each stitch across forming the top of the pants (16 stitches)
RIGHT PANT LEG
Row 1 - 2 sc in 1st sc, (one increase made), sc in next 7 stitches, 2 sc in next sc (2nd increase made), ch 1, turn (10 stitches) (beginning of right leg)
Row 2 - sc in each stitch across row, ch 1, turn (10 stitches)
Row 3 - sc in each stitch across row, ch 1, turn (10 stitches)
Row 4 - sc in each stitch across row, ch 1, turn (10 stitches)
Row 5 - slip stitch in each stitch across row and up along the inside edge of the leg. The working yarn will now be at the start of the beginning of the left leg.
LEFT PANT LEG
Row 1 - 2 sc in 1st sc, (one increase made), sc in next 7 stitches, 2 sc in next sc (2nd increase made), ch 1, turn (10 stitches) (beginning of right leg)
Row 2 - sc in each stitch across row, ch 1, turn (10 stitches)
Row 3 - sc in each stitch across row, ch 1, turn (10 stitches)
Row 4 - sc in each stitch across row, ch 1, turn (10 stitches)
Row 5 - slip stitch in each stitch across bottom of row, fasten off yarn leaving an 8" tail.
ASSEMBLING OUTFIT
  1. Slip bunny's arms into armholes,
  1. Fold pant leg in half, wrapping around bunny's leg with the opening towards the inside of the leg, using tail of color B at bottom of leg, sew inner leg seams together up the one leg and down the other leg. Weave the end of the yarn in to finish off.
  1. Using the tail of Color B at the beginning of the pant waist, sew the back seam of the pants together, and weave in the excess yarn to finish off.
  1. Using the yarn tail from Color A, sew the back seam of the shirt closed and weave in ends.

Thank you for supporting our sponsors:


* © COPYRIGHT: All content is copyrighted to original creators as stated on their patterns. You may provide a direct LINK to the patterns on my pages, but you may NOT post actual full patterns anywhere in any media form. Any items made from patterns © to Beverly Qualheim may be sold, but please make one for charity too.