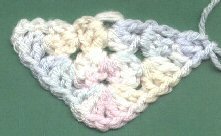
Burial Pouch
Copyright 2000 - 2013 TONI KIMMELL - All Rights Reserved.
Posted with permission.
The Pouch consists of a simple granny square and a half granny square joined with a single crochet -- a border is added last
Copyright 2000 - 2013 TONI KIMMELL - All Rights Reserved.
Posted with permission.
The Pouch consists of a simple granny square and a half granny square joined with a single crochet -- a border is added last
(BEV..
I recommend that this pouch be lined with soft flannel or a silky
lining. This helps to absorb fluids, and it helps so that the
tiny baby's fingers are not caught in the holes as the nurse is placing
the little one inside.)


J Hook
- Baby or sportweight yarn
1/8"
or 1/4" Satin Ribbon
I
make a granny square a little different from the traditional square --
I like to turn my work so there is not a right and wrong side --
obviously, you can use your own pattern --
Granny
Square:
Round
1: Wrap yarn tightly around tip of finger three times -- push
yarn up through yarn circle and catch with your crochet hook --
CH
3 (counts as first DC now and throughout). In circle - 2
DC, CH 1, 3 DC; (3DC, CH 1, 3DC) THREE times; slip stitch to top
of starting CH 3 to
join. CH 3, turn.
Round
2 - 12: 2DC in space below your turning CH 3. For corners -
in CH 1 space of previous round, work 3 DC, CH 1, 3 DC. For sides
of square - in space between groups of 3 DC, work 3 DC.
At end
of each round, join in top of turning CH 3 with a slip stich; CH 3,
turn.
Fasten
off after Round 12 or desired size.
Half Granny Square:


Row
1: Wrap yarn tightly around tip of finger three times -- push
yarn up through yarn circle and catch with your crochet hook --
CH 3
(counts as first DC now and throughout), 2 DC in circle, CH 1, 3 DC; CH
3, turn
Row
2: 2 DC in last DC of Row 1. In CH 1 space of Row 1 - 3 DC,
CH 1, 3 DC. 3 DC in top of CH 3 turning chain of Row 1. CH
3, turn
See
sample picture above
Row
3 - 12 (or number of rounds used in full granny square): 2 DC in
last DC of previous row; 3 DC in space between each group of 3 DC of
previous row; 3 DC, CH 1, 3 DC in CH 1 space of previous row; 3 DC in
space between each group of 3 DC of previous row; 3 DC in top of CH 3
turning chain of previous row; CH 3, turn.
Hope I
haven't lost anyone yet!
Do NOT
fasten off!
Placing
Half Granny on top of Granny Square, matching sides and one corner --
join the two using a single crochet, working through edges of both
pieces - do NOT fasten off!
Work
a border of your choosing (I like a shell of **3 DC, CH 1, 3 DC; skip 3
DC group, SC in next space; skip 3 DC group, repeat from **) diagonally
across top of the half granny, up the top side of the granny to top
corner -- continue around granny square until you have a border around
the entire piece; fasten off. Sew in ends.
Weave
a ribbon around pouch just below the border -- leaving a 'tail' of at
least six inches, start approximately two inches in from edge of top of
half granny, around two top sides of the granny and back in
approximately two inches on other side of the top of the half granny;
leave a 'tail' to match the other side (this will make more sense
as you do it - really is not difficult). You will need to either
knot your ribbon around one stitch on the half granny on either side or
tack it with a needle and thread. Your two 'tails' on either side
will be drawn together and tied in a bow once the infant is placed in
the pouch.
* COPYRIGHT: All
content is copyrighted to
original creators. You
may print out pages for yourself, or for charity IF credit is
given on each page to Bev's Country Cottage. Publishing
this content
on other websites, in emails, mailing lists, in any print media, OR the
selling of these patterns, or items made from them, is FORBIDDEN! These
patterns are for
humanitarian or family/gifts ONLY!
Direct
linking to a pattern or recipe is allowed.
Afghans
/ Armed
forces
/ Babies/Preemies
/ Barbie
Doll clothes / Children
/ Cross
Stitch / Hospital
/ Household
/ Humanitarian
Aid / Plastic
Canvas / Seniors
/ Winter