Check
out Bev's
BLOG ~
Bev's Journeyings
for knitting, crochet, recipes, and news!
Bev's
Little Orphan Socks Copyright
2007, Beverly A. Qualheim
- All Rights Reserved
Sized for 3-6 months, 6-12 months, 12-18 months, 2-3 year old Created for the many little ones who face
cold winters, in orphanages, and elsewhere worldwide. Let's warm their
feet! These are not hard to make and I know many thousands of pairs are
needed all over the world. MATERIALS
NEEDED Size
8 double pointed knitting needles 2 oz Worsted Weight Wool ~ FELTED
Pink pair (photo to the left)
<--- Pink socks to left - 12 - 18
month baby - Lamb's
Pride yarn and then felted the little socks by
hand washing and then drying in a dryer.
I also knitted only 5 rows instead of 8 for foot. However, I decided I
needed larger socks after making the first pair. After felting
they measure 2.5" across cuff (but it doesn't stretch much), 4.75"
length of foot, and 4" tall from
heel to top of sock. Incredibly warm though! OR
2 oz Worsted weight 4 ply Red Heart yarn (will fit 2-3 year old)Measure: 2.5" across cuff, 5.75"
length of
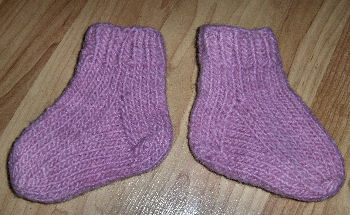
foot, and 5.25" from heel to top of sock. OR USE
Size 5 Knitting needles and approx. 1 oz baby yarn - (For
3-6 month babies) see
samples in photo to right. I used 'Caron Simply
Soft Baby' for the yellow ones and 'Lion Brand Baby Soft' for the blue
ones. Yellow measured 4.5" tall and 4.5" wide. Blue measured 4"
tall and 4" wide.
RIBBED CUFF: Cast on 24
stitches then divide them evenly onto 3 needles- 8 sts on each. Join and work
knit 1, purl 1 around. Work in this ribbing for the cuff of the sock
for 8 rounds. Now knit every
round for 8 rounds . DIVIDING FOR THE
HEEL: Move
stitches so there are 12 stitches on needle 1, and 6 stitches on each
of needle 2 and needle 3. Now just work back and forth across needle 1
as follows: Row1: Slip 1 stitch and
knit to end. Row
2: Slip 1
stitch and purl to end. Repeat these 2
rows for 12 rows total, then work the first row again. The heel will
now be 13 rows long.
TURNING THE HEEL -
this honestly is not scary. Just go for it! Row
1: Slip 1
stitch, P7, P2tog, TURN. Row
2: Slip
1 stitch, K4, K2tog, TURN. Row
3: Slip 1
stitch, purl to 1 st. before the last turn (there's a little space
there), P2 tog, TURN. Row
4: Slip 1
stitch, knit to 1 st. before the last turn (look for the space again),
K2 tog, TURN. Repeat rows 3
& 4 until all stitches at the ends are used up, ending with a right
side row. There will be 6 stitches left.
With the right
side of your work facing you, pick up the 8 slipped stitches and then
knit them. (needle 1). Using
a new needle, knit across the stitches on the next 2 needles (needle
2). Using a new needle, pick up and knit 8 stitches along the other
side of the heel, and continue knitting to the center of the heel
stitches (3 stitches) (needle 3). There should now be 11 stitches on
needles 1 & 3, and 12 stitches on needle 2. The center of
the heel is the beginning of the round, needle 2 contains the instep
stitches. Begin decreasing as follows: Round 1: Knit. Round
2: Knit to within 3 stitches of the end of the first needle, K2tog, K1.
Knit across second needle. On third needle, K1, slip 1, K1, PSSO (pass
slipped stitch over), knit to end. Repeat rounds 1
& 2 until there are 6 stitches left on both needles 1 & 3 and
you keep the 12 on needle 2.
FOOT: Knit in the
round again for 8 rounds to finish the length of the foot.
TOE
SHAPING/NARROWING: Begin decreasing
as follows: Round
1:
On needle 1: knit to last 3 stitches, K2tog, K1. On needle 2: K1, Slip
1, K 1, PSSO (pass slipped stitch over), knit to last 3 stitches,
K2tog, K1. On needle 3: K1, Slip 1, K 1, PSSO, knit to end (center of
heel). Round
2: Knit. Repeat rounds 1
& 2 until there are only 12 stitches left (3 stitches on needles 1
& 3, and 6 stitches on needle 2).
KITCHENER STITCH to
close the toe: Continuing
to knit with needle 3, knit to the end of needle 1. There are now only
2 needles in use, 6 stitches on each. Cut the yarn, leaving 14”. Thread
it onto a yarn needle for sewing.
Instructions for Kitchener stitch - great video here Instructions
from this SITE Hold
the 2 needles parallel. You will now have a front needle and a
back needle. Always keep the yarn beneath the needle as you work. Step 1: Go into
the first stitch on the front needle as if to knit, pull the stitch off
the needle. Step 2: Go into
the second stitch on the front needle as if to purl, leave stitch on
the needle. Step 3: Go into
the first stitch on the back needle as if to purl, pull the stitch off
of the needle. Step 4: Go into
the second stitch on the back needle as if to knit, leave the stitch on
the needle. Now you have 4
new stitches to work with. Repeat steps 1 - 4 until all stitches are
woven. Anchor on inside, weave in ends.
Start
your 2nd
sock right now!
------------------------------------------------
These
socks, along with warm
mittens and gloves can be mailed to
LDS Humanitarian or send to a charity of your choice. Here is the
address for LDS
Humanitarian who are serving many orphanages and other places in need
around the world.
Latter-day Saint Humanitarian Center 1665 Bennett Rd Salt Lake City, UT 84104
All
content is copyrighted to
original creators. You
may print out pages for yourself, or for charity IF credit is
given on each page to Bev's Country Cottage. Publishing
this content
on other websites, in emails, mailing lists, in any print media, OR the
selling of these patterns, or items made from them, is strictly
prohibited These
patterns are for
humanitarian or family/gifts ONLY! Direct
linking to a pattern or recipe is permitten