 Bev's
2
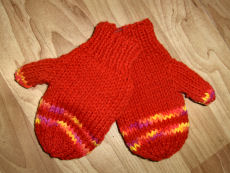
Needle KNIT MITTENS FOR KIDS
Bev's
2
Needle KNIT MITTENS FOR KIDS (You
can also hold together 1 strand of ww yarn and 1 strand of
washable sock yarn for more warmth.)
MATERIALS:
4 stitch markers
2 stitch
holders
yarn sewing
needle.
Knitting
needles sizes 5 (3.75 mm) and
7 (4.5 mm) (6 / 4 mm and 8 / 5 mm) for larger sizes)
Knitting needle and crochet hook conversion chart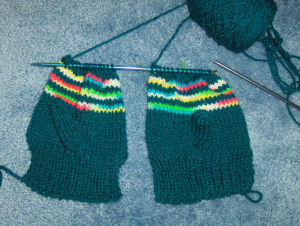
Both mittens can be
knitted at the same time. Simply use 2 skeins of the same yarn,
or yarn from the middle and outside of the same skein.
Cast on 2
mittens on the same needle and work
across using the yarn from one
skein for one mitten and yarn from the other skein for the 2nd
mitten. Works great! -------->
Start withThe CUFF
(using
smaller sized needles 5 or 6): Cast
on 28
sts.
Work in ribbing of k1, p1 for 10 (12)
(14) rows.
HAND:
(using larger needles)
 <----- Row
1: inc 1 st in each of first 2 sts (make your increases by
knitting into "horizontal loop" between 1st and 2nd stitches- see photo
to left),
k across, inc 1 st
in each of last 2 sts - 32 sts.
<----- Row
1: inc 1 st in each of first 2 sts (make your increases by
knitting into "horizontal loop" between 1st and 2nd stitches- see photo
to left),
k across, inc 1 st
in each of last 2 sts - 32 sts.
Row
2: Purl
Row
3: Knit
Row 4: Purl
Row
5: K 15, place marker on needle, increase in each of the next 2
sts,
place a marker on needle, k 15.
Row 6: Purl
Row 7: K 15, slip marker, increase
in next st (make your increase by
knitting into base
of next stitch instead of into top of the next st. Makes
for a neater increase.),
k2, increase in next st, slip marker, k 15.
Next few rows: Continue to
increase 1
stitch after first marker and
before 2nd marker every knit row until there are
12 (14 for largest
size) sts between markers. (Don't forget to PURL on even numbered rows)
(You
are going to place some
stitches on holders here, so you can work on the thumb)
Next row: (This is a purl row)
P16 (you will have to remove marker for the 16th stitch); slip those stitches to a stitch holder,
p 10 (12 - for both larger
sizes) (this will become the thumb);
slip remaining 16 sts to another holder
(removing the marker).
THUMB: Work even for 4
(6) (8) rows. K 2 tog across next row. Break yarn;
leave 8" end for
sewing. Run yarn through remaining sts, draw up tightly and
fasten. Sew thumb seam- backstitching 3 sts to secure, cut yarn.
TOP: Join yarn at beg of 2nd holder, p to end of row purling
right off the holders back onto needles. Work even on 32 sts for
12 (14) (16) rows.
You
can change colors on knit rows (right side of mitt) if you wish
to add stripes.
SHAPE/decrease TOP:
Row 1: (k 2 tog, k2) 8 times.
Row 2:
Purl
Row 3:
(k2 tog, k1) 8 times.
Row 4: Purl.
Row 5: K 2 tog across. Break yarn; run through remaining sts and
fasten.
Make a 2nd mitten in the same
manner. Sew up seams by whip stitching or use the MATTRESS
STITCH so it's 'invisible'.
Fasten mittens together with a safety pin.
-------------------------------------------------------------------------------------------------------
"Every year our local TV station does a mitten
drive for needy kids in the area. I've been feeling like making
some mittens lately and decided I'd make some for the mitten drive.
WELL! ... after muddling my way through two patterns for kids'
mittens that made my head ache (left inc here, right inc there, purl
dec the other place) and didn't even come out that well, I thought
"geesh! I just want to make some warm mittens for some
kids. These patterns are like making my family a ten-course
gourmet meal when all they really want is a good meatloaf and some
mashed potatoes!" LOL ... and then I found your pattern for 2
needle kids mittens. i've almost finished the first pair
already! Your pattern is a joy - simple and easy to follow.
The mittens are just nice, warm kids' mittens. I'm thrilled!
Thank you so much for publishing it!"
Warm regards, Vicki Brooke
 MATERIALS:
You
can adjust the pattern to fit whatever size head you want.
Child sized 3-5,
6-8,
(9-11)
Size 10 (6 mm)
(size 4 UK) knitting
needles
2 oz of bright colored Worsted Weight/10 ply UK - yarn
(Use 2
strands of yarn held together to make this extra cozy, this will make
the hat a bit larger)
Cast on (54 sts) 62
sts (70)
Row 1- ribbing:
K1, P1, K1
across line, ending with P1.
Row 2 - 6:
Repeat
Row 1.
Row 7:
Knit across
Row 8:
Purl across
Repeat these 2 rows
until hat is 7" (8 1/2") (9")
from start, ending with a purl row. (You can also make this whole
hat in ribbing Knit 1, purl 1)
Start Decrease
1st decrease row-
K2 together across the row.
Next row:
Purl
Next row:
K2 together
across
Last row:
Purl
across.
Cut a 14" tail of yarn, thread a yarn needle with it. Carefully
pull
the last row of knitting from the needle and thread the needle through
every stitch. Pull tightly then whip stitch the seam shut.
Add a Pom Pom to the top.